0

Eu implementei um Navigation Drawer (sem mtas modificações do exemplo do Android Developers) Alterei somente as cores do background do ListView e do Texto dos itens:

layout/activity_main.xml:

<android.support.v4.widget.DrawerLayout
    xmlns:android="http://schemas.android.com/apk/res/android"
    android:id="@+id/drawer_layout"
    android:layout_width="match_parent"
    android:layout_height="match_parent">

<!-- As the main content view, the view below consumes the entire
     space available using match_parent in both dimensions. -->

<FrameLayout
    android:id="@+id/content_frame"
    android:layout_width="match_parent"
    android:layout_height="match_parent" />

<!-- android:layout_gravity="start" tells DrawerLayout to treat
     this as a sliding drawer on the left side for left-to-right
     languages and on the right side for right-to-left languages.
     The drawer is given a fixed width in dp and extends the full height of
     the container. A solid background is used for contrast
     with the content view. -->
<ListView
    android:id="@+id/left_drawer"
    android:layout_width="240dp"
    android:layout_height="match_parent"
    android:layout_gravity="start"
    android:choiceMode="singleChoice"
    android:dividerHeight="0dp"
    android:background="#ffe1e1e1"/>

</android.support.v4.widget.DrawerLayout>

layout/drawer_list_item.xml:

<RelativeLayout xmlns:android="http://schemas.android.com/apk/res/android"
    android:layout_width="match_parent"
    android:layout_height="48dp"
    android:background="?android:attr/activatedBackgroundIndicator">

<ImageView
    android:id="@+id/icon"
    android:layout_width="25dp"
    android:layout_height="wrap_content"
    android:layout_alignParentLeft="true"
    android:layout_marginLeft="12dp"
    android:layout_marginRight="12dp"
    android:contentDescription="@string/list_item_icon"
    android:src="@drawable/ic_logo_icone"
    android:layout_centerVertical="true"/>


<TextView xmlns:android="http://schemas.android.com/apk/res/android"
    android:id="@+id/text1"
    android:layout_width="match_parent"
    android:layout_height="wrap_content"
    android:textAppearance="?android:attr/textAppearanceListItemSmall"
    android:gravity="center_vertical"
    android:paddingLeft="45dp"
    android:paddingRight="16dp"
    android:textColor="#ff555555"
    android:textStyle="bold"
    android:hint="@string/item_desc"
    android:background="?android:attr/activatedBackgroundIndicator"
    android:minHeight="?android:attr/listPreferredItemHeightSmall" />

</RelativeLayout>

E eis que surge meu Navigation Drawer:
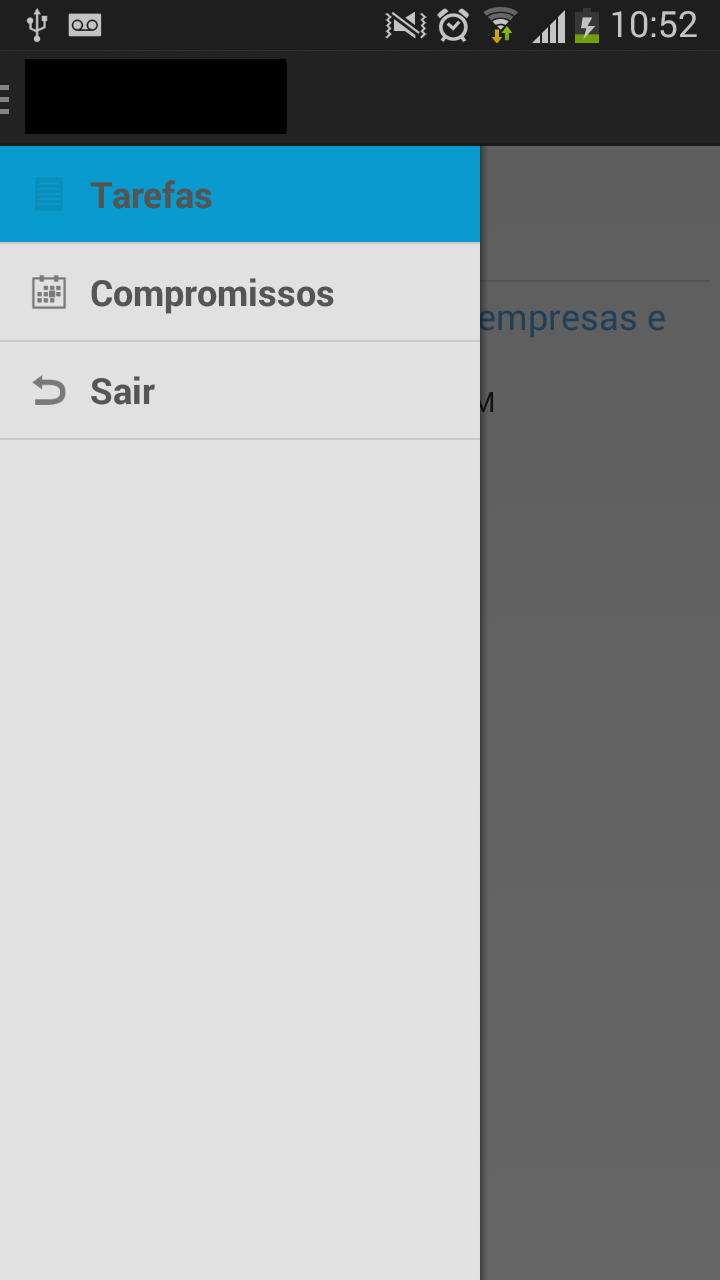
Navigation Drawer

O problema, como vcs podem ver, é que quando o item está selecionado, a cor azul sobrepõe o Icone deixando ele mais apagado, e a cor do texto também é sobreposta tendo uma leve alteração de tonalidade.

Eu gostaria de que meu icone e meu texto nao tivesse alteração de cor, que ficasse azul somente nas áreas brancas da view. Eu já tentei mtas configurações nos XMLs e tentei fazer outras coisas programaticamente também, mas nada resolveu.

5
  • Acredito que seus ícones estão com alpha, por isso a cor azul se sobrepõem, tente colocar uma cor no background do ImageView, possivelmente igual ao fundo do item, pra ver se faz contraste.
    – Wakim
    Commented 22/07/2014 às 15:33
  • não adianta adicionar cor no background do ImageView, continua com o mesmo problema. Commented 22/07/2014 às 15:46
  • Tenta fazer um selector separado e colocar no background do seu Relative do list_item ao invés do ?android:attr/activatedBackgroundIndicator. Sempre uso assim e funciona.
    – Helder
    Commented 22/07/2014 às 17:15
  • no meu RelativeLayout do drawer_list_item eu já coloquei o atributo android:background="?android:attr/activatedBackgroundIndicator", mas eu nao faço um selector separado. Eu uso mDrawerList.setSelection(position); pra fazer selector. Commented 22/07/2014 às 17:33
  • acabei de tentar fazer selector separado com a função: mRelativeLayout.setBackground(getResources().getColor(R.color.blue)); mas nao deu certo. O texto eu consegui resolver, mas o icone, nao vai de jeito nehum! :( Commented 22/07/2014 às 17:45

1 Resposta 1

1

Consegui resolver o problema. Eis a solução:

Na app de exemplo do Android Developers, é utilizado a seguintes funções para selecionar um item:

    mDrawerList.setItemChecked(position, true);
    mDrawerList.setSelection(position);
    setTitle(mTitles[position]);
    mDrawerLayout.closeDrawer(mDrawerList);

Ai foi sugerido eu fazer manualmente o selection, porém mesmo eu comentando os métodos mDrawerList.setItemChecked(position, true); e mDrawerList.setSelection(position); ainda continuava selecionado devido a configuração: android:choiceMode="singleChoice" que não poderia ser retirada pois isso impactou em outros problemas no programa.

A solução foi entcontrada ao recarregar o adapter usando a função mDrawerList.setAdapter(adapter); e no meu adapter eu pude fazer manualmente o selection.

Então meu código ficou assim:

    mDrawerList.setItemChecked(position, true);
    mDrawerList.setSelection(position);
    adapter.setSelectedItem(position);
    for(int i = 0; i < DrawerItems.size(); i++){
        DrawerItems.set(i, new DrawerItem(mTitles[i], getResources().obtainTypedArray(R.array.nav_drawer_icons_light).getResourceId(i, -1)));
    }
    DrawerItems.set(position, new DrawerItem(mTitles[position], getResources().obtainTypedArray(R.array.nav_drawer_icons).getResourceId(position, -1)));

    mDrawerList.setAdapter(adapter);
    setTitle(mTitles[position]);
    mDrawerLayout.closeDrawer(mDrawerList);

E meu adapter assim:

public class DrawerAdapter extends BaseAdapter {

 (...)
 private int mSelectedItem = -1;

 (...)

  @Override
  public View getView(int position, View convertView, ViewGroup parent) {
    if (convertView == null) {
        LayoutInflater mInflater = (LayoutInflater)
                context.getSystemService(Activity.LAYOUT_INFLATER_SERVICE);
        convertView = mInflater.inflate(R.layout.drawer_list_item, null);
    }

    RelativeLayout container = (RelativeLayout) convertView.findViewById(R.id.drawer_item_container);
    ImageView imgIcon = (ImageView) convertView.findViewById(R.id.icon);
    TextView txtTitle = (TextView) convertView.findViewById(R.id.text1);

    if(position == mSelectedItem){
        txtTitle.setTextColor(context.getResources().getColor(R.color.white));
        container.setBackgroundColor(context.getResources().getColor(R.color.blue));
    } else {   
       txtTitle.setTextColor(context.getResources().getColor(R.color.drawer_text_unselected));             
       container.setBackgroundColor(context.getResources().getColor(R.color.drawer_background));
    }

    imgIcon.setImageResource(DrawerItems.get(position).getIcon());
    txtTitle.setText(DrawerItems.get(position).getTitle());

    return convertView;
  }

  public void setSelectedItem(int position){
      mSelectedItem = position;
  }
}

Você deve fazer log-in para responder a esta pergunta.

Esta não é a resposta que você está procurando? Pesquise outras perguntas com a tag .